
The Ultimate Guide to Garage Door Repair: Troubleshooting, Safety & Costs
You rarely think about your garage door until you press the button and nothing happens. Suddenly, your car is trapped, your routine is disrupted, and your home is left vulnerable.
I’m Carlos Mendez, a Lead Specialist with 18 years of experience in the industry. I’ve worked on everything from basic residential doors to complex Viking automation systems, and I’ve seen it all. I have seen homeowners save hundreds of dollars by simply realigning a sensor, and I have seen others put their safety at serious risk attempting repairs that require professional training.
Understanding how your garage door system works is the best way to make smart decisions. This guide is designed to bridge the gap between “making a quick fix” and “knowing when to call for help.”
Whether you are trying to silence a squeaky roller, diagnose a humming opener, or determine if that repair quote you just received is fair, I’ve written this guide to cover it all. Below, we will break down the most common mechanical issues, the critical safety warnings you need to know, and the real costs associated with getting your system running smoothly again.
Key Takeaways :
- Diagnose Like a Pro: Learn to spot the difference between a simple misaligned sensor and a critical mechanical failure before you call for service.
- DIY vs. Danger Zones: clearly define which repairs are safe to handle with basic tools and which, like torsion springs, require a certified technician to avoid injury.
- Critical Safety Protocols: Understand the specific risks associated with high-tension cables and how to protect your family while the garage door is under repair.
- The Real Cost of Repair: Get a transparent view of parts pricing versus labor rates so you can evaluate the actual cost of DIY attempts versus hiring a professional.
- Weather Impacts: Discover how seasonal temperature swings and humidity affect your opener’s logic board and mechanical components.
- Hiring Smart: Gain insider tips on how to vet local service providers, spot “bait-and-switch” quotes, and verify licenses.
Common Garage Door Problems and Solutions
In my 18 years of field work, I’ve learned that garage doors rarely fail without warning. Most “sudden” emergencies actually start as small noises or glitches that homeowners ignore until it’s too late.
The good news? Many of these common issues have straightforward solutions. Knowing what to look for and listen to can save you an expensive emergency service call later.
1. Noisy Operation (Grinding, Squeaking, or Rattling)
A quiet system is a happy system. If your door suddenly sounds like a freight train, the specific type of noise usually tells you exactly what is wrong:
- Rumbling or Rattling: This often points to loose hardware. Years of vibration can loosen the nuts and bolts on your track and hinges.
- The Fix: Grab a socket wrench and tighten all accessible nuts and bolts (avoid the red-painted bolts on the spring assembly).
- Grinding or “Clunking”: Check your rollers. If they are worn out, the stems are loose, or the bearings are shot, they will drag instead of roll.
- The Fix: Try lubricating them first. If that fails, replacing them yourself costs around $15-30 per roller, though it does require removing the panels.
- Squeaking: This is usually a lubrication issue.
- Pro Tip: Never use WD-40. It attracts dust and eventually gums up the works. I only use a silicone-based spray or white lithium grease on rollers, hinges, and springs
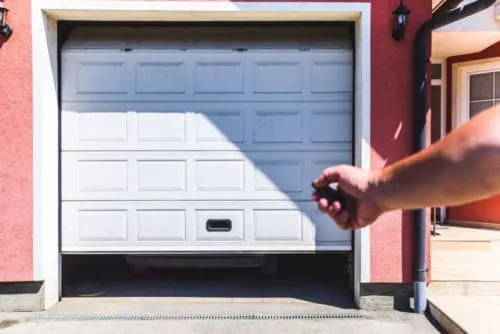
2. The Door Won't Open or Close Completely
It is frustrating when your system stops halfway, reverses unexpectedly, or refuses to budge. Here is how to troubleshoot the most common culprits:
Misaligned Safety Sensors (The #1 Cause): In my experience, sensors are the primary cause of this issue about 60% of the time. The photo-eyes on either side of the opening must be able to “see” each other perfectly to function.
- What to look for: Dirt, spider webs, or a stray broom handle might be blocking the beam.
- The Fix: Clean the lenses with a soft cloth and adjust them until the LED indicators on both sides are solid, not blinking.
Travel Limit Settings. If the sensors look fine, but the door stops six inches short or hits the floor and immediately reverses, your opener’s “Travel Limits“ likely need adjustment. These settings tell the motor exactly how far to run.
- The Fix: Locate the adjustment screws (or digital buttons) on your motor unit. Make minor adjustments until the door seals gently against the floor.
Damaged Weather Stripping. If the door closes but you can see daylight under it, your bottom rubber seal is likely cracked or torn. This prevents a proper seal and causes the door to bind near the floor.
- The Fix: Replacing weather stripping is a great DIY project. It typically costs $20-40 for materials and takes about 30 minutes.
Note: If these solutions don’t work, you may be dealing with broken cables or spring tension issues. These require a professional evaluation.
Signs Your Garage Door Needs Professional Repair
Some garage door issues announce themselves loudly with a bang, but others develop quietly. In my experience, recognizing these early warning signs is the difference between a $150 repair today and a $1,500 replacement next month.
If you notice any of the following, stop using your system immediately. Continuing to run a compromised door is a safety hazard for your family and a death sentence for your opener.
1. Operational Warning Signs
These are issues you can feel or hear while the door is moving.
- Frayed Cables: Cables bear the enormous weight of your door. If you look closely and see broken wire strands or the cable looks “fuzzy,” it is on the verge of snapping. Do not cut the cable or try to replace it yourself. A snapping cable can whip around with enough force to damage your car or cause serious injury.
- Crooked or “Jerky” Movement: Watch your panels as they rise. They should move smoothly and stay level. If one side lags behind, or if the door “jerks” its way up the track, you likely have a slipped cable drum or uneven spring tension.
- The Risk: Running the door like this puts massive strain on the rollers and motor, often causing the door to jam in the tracks.
- Excessive Shaking: Some vibration is normal, especially with older wooden doors. However, if your wall shelves shake or the opener rail rattles violently, you have a structural issue. This usually points to a loose torsion tube or a track that has pulled away from the wall framing.
- Intermittent “Ghost” Operation: Does your door work fine on Tuesday but refuse to budge on Wednesday? This inconsistency usually suggests a failing logic board or dying motor capacitor.
- Carlos’s Insight: Temperature often plays a role here. I usually see circuit boards develop microscopic cracks that expand in heat and contract in cold, causing these frustrating intermittent failures.
2. Physical Damage Requiring Expert Assessment
Sometimes the damage is visible even when the door is closed.
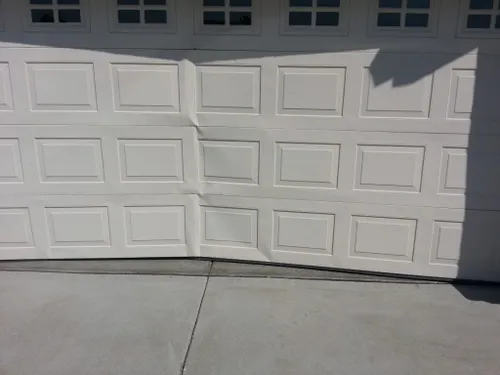
- Deep Dents: A stray baseball hitting a panel is usually just a cosmetic issue. However, if a car backs into the door, the dent can be deep enough to bend the customized shape of the panel joints. This prevents them from hinging correctly as they turn the corner of the track, eventually causing the door to buckle.
- Rust on Springs or Cables: Surface rust on a track can be sanded off. But rust on a spring is a ticking time bomb. Corrosion creates weak points in the metal coils. Since springs are under high tension, these weak spots are where they will eventually snap.
- Safety Rule: Never try to clean or service a rusty spring yourself. The friction from scrubbing can sometimes be enough to cause a failure.
- Cracked or Separating Panels:
- Steel Panels: Check the top and bottom seams. If they are separating, the panel loses its structural rigidity.
- Wood Panels: Look for rot or termite damage at the bottom.
- Fiberglass: Watch for “spiderweb” cracks caused by UV exposure. Any of these issues usually requires panel replacement. A professional can evaluate if we can swap out just the damaged section or if the whole door needs to be upgraded.
DIY vs. Professional Repair: Drawing the Line
In my trade, the line between “resourceful homeowner” and “emergency room visit” is often a single bolt. Making the wrong choice costs money, time, and potentially your safety.
Here is my honest breakdown of what you can handle yourself and what requires a certified technician.
Simple Maintenance Tasks (Safe for Homeowners)
- Lubrication (The #1 Maintenance Task) Twice a year, apply a silicone-based lubricant or white lithium grease to all moving parts: hinge pins, roller stems, and the bearings.
- Carlos’s Rule: Step away from the WD-40. It is a solvent, not a lubricant. It attracts dirt and will gum up your rollers within months.
- Sensor Alignment: If your door reverses for no clear reason, check the photo eyes at the bottom of the track. They should face each other directly with both LED indicator lights solid (no blinking).
- The Fix: Use a level to ensure they are mounted at the same height, and wipe the lenses with a soft cloth.
- Weather Stripping: The rubber seal at the bottom of your door takes a beating. When it cracks, energy bills go up, and pests get in.
- The Fix: You can buy a replacement roll for $20-40. Just remove the old rubber from the retainer track and slide the new one in.
- (Tip: Use a little dish soap to help it slide in.)
- Hardware Tightening: Vibration loosens everything eventually. Grab a socket wrench and tighten the nuts on the track brackets and door hinges.
- Warning: Never loosen the red-painted bolts on the bottom brackets or the spring mounting plate. These are under extreme tension. Carlos’s Safety Note: Unsure if your repair is safe to handle? Don’t risk injury on a weekend project. We offer a specific Safety Inspection for homeowners who just need a professional diagnosis.
Safety Precautions: Rules to Live By
Safety isn’t optional when working around a garage door system. You are dealing with extreme tension (enough to lift 400 lbs), heavy suspended weights, and live electricity. In my line of work, we have strict protocols for a reason.
Following these rules prevents the kind of injuries that send hundreds of homeowners to the emergency room every year.
The "Red Zone": DO NOT TOUCH
Torsion Springs & Cables I cannot stress this enough: Never attempt to adjust or replace garage door springs yourself.
- The Risk: Torsion springs (mounted above the door) store massive amounts of potential energy. If a winding bar slips or a casting breaks while you are tensioning it, the metal bar becomes a deadly projectile.
- The Cables: The cables are under the same tension. Never loosen the bottom bracket where the cable attaches. If that bracket comes loose, the cable snaps back with the force of a whip.
- Carlos’s Advice: The $150 you save doing this yourself isn’t worth the risk of a permanent hand or facial injury. Leave the springs to us.
The Safe Repair Process: 5 Critical Steps
If you are performing safe maintenance (like lubrication or sensor alignment), follow this checklist every single time:
1. Kill the Power Before you touch a single bolt or wire, unplug the opener from the ceiling outlet or flip the circuit breaker.
- Why? Many injuries occur because someone accidentally hits a remote button while another person has their hands near the rollers or gears. Once the power is off, press the wall button to confirm the system is dead.
2. Eye Protection is Mandatory. Springs, cables, and even old, rusted fasteners can snap and fly in unpredictable directions. Debris often falls from the tracks while you are working overhead.
- The Gear: Regular prescription glasses aren’t enough. Invest in ANSI-approved safety glasses that wrap around your face.
3. Secure the Door (The C-Clamp Trick) Never place your body under a suspended door unless it is mechanically locked in place. Even with the power off, a door can fall if a cable snaps.
- The Fix: Use C-clamps or locking pliers (Vise-Grips) on the tracks just below the rollers to prevent the door from sliding down while you work.
4. Clear the Area. Curiosity can be dangerous. Keep children and pets entirely out of the garage while you work. A child pulling on a hanging wire or touching a keypad can turn a repair into a tragedy in seconds.
5. The “2×4 Test.” This is the industry standard for safety. Once a month, place a 2×4 piece of wood flat on the ground where the door closes.
- The Test: Close the door. When it hits the wood, it should automatically reverse and go back up.
- The Result: If the door pushes down and crushes the wood without reversing, your “Force Settings” are too high. Adjust them immediately to prevent crushing injuries.
Smart Lifting
Garage door panels weigh 50–100 pounds each. If you are stacking panels or moving a door manually, lift with your knees, not your back. In professional crews, we almost always use two technicians for panel work to ensure stability.
How Weather Affects Your Garage Door
If you live in an area with four seasons, your garage door behaves differently in January than it does in July. Temperature swings and moisture don’t just make the garage uncomfortable, they physically alter the mechanics of your door system.
Understanding these changes helps you anticipate problems before you are stuck in the driveway.
1. Cold Weather Challenges
- Metal Contraction: Steel shrinks when it freezes. This can cause springs to lose a slight amount of tension, making the tracks tighter. If your door was already unbalanced, a cold snap might be the final straw that makes it too heavy for the opener to lift.
- The “Thick Grease” Issue: This is the most common winter problem I see. Standard grease turns into a thick, sticky paste in freezing temps. Instead of lubricating the tracks, it acts like glue, forcing the motor to work twice as hard.
- The Fix: Use a low-temp lithium grease or silicone spray that remains viscous even below freezing.
2. Summer Heat & Sun Glare
- Phantom Reversals (Sun Blindness): If your door refuses to close at 4:00 PM every day but works fine at night, check the sun. Direct sunlight hitting a safety sensor lens can “blind” it, breaking the infrared beam.
- The Fix: You can tape a small piece of cardboard over the sensor unit (not the lens!) to create a sun visor.
- Overheating: Motors have thermal overload protectors. If you open and close the door repeatedly on a 95°F day, the motor might shut down to protect itself. Give it 15 minutes to cool off.
3. Humidity & Moisture
- Wood Door Swelling: Wood is a sponge. In high humidity, wooden panels absorb moisture and swell, causing them to jam against the door frame or tracks.
- Rust: Moisture is the enemy of tension springs. Even surface rust creates friction and pitting in the metal coils, which significantly shortens the lifespan of the spring.
4. Ice Formation (The Gear Stripper)
- Frozen to the Floor: If water pools under the bottom rubber seal and freezes, the door becomes glued to the concrete.
- Warning: Never hit the wall button to force a frozen door open. The motor will spin, but the door won’t move. The result? You will strip the internal plastic gears in the opener unit, a very common, preventable repair.
- The Fix: Use a heat gun or hot water to melt the ice along the bottom seal. Do not use rock salt, as it will corrode the bottom aluminum retainer.
Seasonal Maintenance Checklist
To keep your system running smoothly, I recommend a “Spring Clean” and a “Fall Prep.”
Spring Preparation (Post-Winter Recovery)
- Wash the Hardware: If you live where roads are salted, that salty slush splashes onto your door. Wash the bottom brackets and tracks with mild soapy water to prevent corrosion.
- The Balance Test: Disconnect the opener (pull the red cord) and lift the door manually halfway up. It should hover in place. If it drops like a stone, your springs have lost tension over the winter and need professional adjustment.
- Lubricate: Apply fresh silicone spray to rollers and hinges that may have dried out.
Fall Winterization (Pre-Freeze Prep)
- Check the Weather Seal: Look at the rubber strip on the bottom of the door. If it is cracked or brittle, replace it now. Once it freezes, it will shatter or let cold air pour in.
- Test the Safety Reversal: Cold weather shifts the ground and the tracks slightly. Test your safety sensors and the “2×4 reverse test” to ensure the force settings are still accurate.
- Battery Backup: If you live in an area prone to winter storms and power outages, now is the time to install a Battery Backup unit for your opener so you aren’t locked out during a blizzard.
Tools of the Trade: What Professionals Use
A garage door system is a mix of heavy industrial mechanics and delicate electronics. To service them safely, I carry a van full of specialized equipment. Understanding these tools helps you appreciate why professional service is often faster and safer than a weekend DIY attempt.
1. The "Pro-Only" Safety Tools
These are the tools that homeowners generally shouldn’t own unless they have specific training.
- Winding Bars (The Widow-Makers): These solid steel rods are designed to fit perfectly into the winding cone of a torsion spring.
- Carlos’s Warning: I have seen DIYers try to wind springs using screwdrivers. Don’t do it. Screwdrivers are brittle; they can snap under the torque, sending the metal shank flying like a bullet. Professional winding bars are hardened steel, sized specifically to prevent slipping.
- Cable Pullers & Vise Grips: Replacing a cable requires holding the heavy door in place while simultaneously keeping tension on the drum. We use specialized locking clamps and cable pullers to act as a “third hand,” ensuring the cable doesn’t unravel or kink during installation.
- Winding Bars (The Widow-Makers): These solid steel rods are designed to fit perfectly into the winding cone of a torsion spring.

2. Diagnostic Equipment (The Technical Wizardry)
As someone who specializes in automation, I spend most of my time here. Modern openers are computers on the ceiling.
- Multimeters: If your opener is dead, I don’t just guess. I use a multimeter to trace voltage drops across the circuit board. This tells me if the issue is a blown capacitor, a shorted wire, or a bad logic board.
- Frequency Testers: Sometimes a remote stops working because of “radio interference” from a neighbor’s LED lights or a nearby radio tower. We use frequency analyzers to detect signal interference that is invisible to the naked eye.
3. Precision & Installation Tools
- Impact Drivers & Socket Sets: Garage doors vibrate constantly. This often “welds” nuts onto bolts over time. We use high-torque impact drivers to break these loose without stripping the heads, something a standard hand wrench often struggles to do.
- Laser Levels: A track that is even slightly crooked (we’re talking 1/4 inch) can cause rollers to pop out. We use laser levels to ensure the vertical and horizontal tracks are perfectly square with the door opening.
4. Safety Gear
You won’t see a reputable technician working in shorts and sandals.
- ANSI-Rated Face Shields: When cutting tracks or winding springs, standard glasses aren’t enough. We need full face protection against flying debris.
- Cut-Resistant Gloves: The edges of steel tracks and cable strands are razor-sharp. Leather or Kevlar gloves are mandatory to prevent slicing hands during installation.
Cost Factors: What You Should Expect to Pay
Understanding what drives pricing is the best way to budget for repairs and avoid being overcharged. When I write up a bill, the final number depends on several variables, from the danger level of the job to the quality of the parts you choose.
Here is a breakdown of current market rates to help you spot a fair quote.
1. Labor Rates & Service Calls
- The “Service Call” Fee: Most companies charge $75–$150 to get a truck to your driveway. This covers fuel, the technician’s time, and the initial diagnosis.
- Pro Tip: Reputable companies will usually waive this fee if you move forward with the repair. If you decline the work, you still owe the diagnostic fee.
- Hourly vs. Flat Rate:
- Hourly: Averages $75–$125/hour. This is typical for general troubleshooting or electrical diagnostics.
- Flat Rate: Common for specific, standard jobs like spring replacement. This provides certainty that the price won’t go up, even if the technician takes longer than expected.
- Emergency Rates: If your door is stuck open at midnight or on a holiday, expect to pay 1.5 to 2 times the standard labor rate. You are paying for the convenience of immediate security when your home is vulnerable.
2. Parts & Material Expenses
Not all parts are created equal. Here is what typical components cost (including installation labor):
- Springs (The Most Common Repair):
- Cost: $200–$400 (installed).
- Carlos’s Recommendation: Always ask for “High-Cycle” springs (rated for 25,000+ cycles). They cost about $30-$50 more upfront but last twice as long as standard builder-grade springs (10,000 cycles).
- Rollers:
- Cost: $130–$180 for a complete set of 10-12 rollers.
- Carlos’s Recommendation: Upgrade to Nylon Ball-Bearing Rollers. They are vastly quieter than cheap steel wheels and don’t require lubrication.
- Opener Replacement:
- Chain Drive: $400–$550 (Reliable but loud).
- Belt Drive: $550–$800 (Whisper-quiet, best for attached garages).
- Smart Openers: High-end models with built-in cameras and battery backups can run $800+.
- Springs (The Most Common Repair):
3. Hidden Factors That Affect Price
- Door Style: Standard sectional doors are the cheapest to fix. One-piece “tilt-up” doors (common in older homes) or custom wood carriage doors often require specialized hardware that costs significantly more and takes longer to source.
- Permits: Believe it or not, some cities require a building permit to replace a garage door or an opener. These fees range from $50 to $200. Unlicensed technicians might skip this, leaving you liable for code violations if you sell your home.
- Warranties: A company offering a 3-year labor warranty will charge slightly more than a “tail-light warranty” guy (who disappears once you can’t see his tail lights). You are paying for the guarantee that they will return for free if something breaks next month.
4. How Timing Affects Cost
- Seasonal Demand: We are busiest in Spring and Fall when homeowners tackle renovation projects. If you schedule non-urgent maintenance (like a tune-up) during the lull of Winter or Summer, you can often get faster service.
- The “Wait till Monday” Rule: If your door is broken on a Saturday but you can safely close and lock it manually, wait until Monday to call. You will avoid the weekend emergency surcharge.
How to Find a Reliable Repair Company (And Avoid Scams)
Finding the right technician makes all the difference between a lasting repair and a recurring nightmare. Unfortunately, the garage door industry has its share of “cowboys,” unlicensed operators who quote low and charge high.
After 18 years in the field, I know exactly how to separate the pros from the scammers. Here is how you can protect your investment.
1. Verify Credentials and Experience
- Check the License: Licensing requirements vary by state (e.g., California requires a specific C-61/D-28 license for door work). Always ask for their license number and verify it with your state’s contractor board.
- Why it matters: Licensed contractors have passed exams, carry bonds, and are accountable for code violations.
- Confirm Insurance: Ask to see a current certificate of General Liability and Workers’ Compensation insurance.
- The Risk: If an uninsured technician falls off a ladder in your garage, you could be liable for their medical bills. Don’t take their word for it, get the paper proof.
- Ask About Tenure: A company that has been around for 10+ years has proven they stand behind their work. But dig deeper, ask how long the specific technician sent to your home has been in the trade. You want a seasoned pro, not a trainee learning on your dime.
2. Evaluating Quotes and Proposals
- The “Three Quote” Rule: For major repairs (like panel replacement or a new opener), always get three written estimates.
- Red Flag: If one quote is significantly lower than the others, they are likely cutting corners on parts or planning to hit you with hidden fees later.
- Detail is King: A quote that just says “Fix door – $300” is useless. A professional proposal itemizes everything:
- Labor cost vs. Parts cost
- Specific Brand/Model numbers (e.g., “LiftMaster 8550W Opener”)
- Warranty terms
- Payment Etiquette: Never pay 100% upfront. A small deposit (25%) for custom-ordered doors is normal, but you should only pay the balance once the work is done and you have tested the door yourself.
- Warning: Be very suspicious of companies that demand cash-only payments. Credit cards give you a paper trail and fraud protection.
3. Red Flags: When to Walk Away
Trust your gut. If you spot these behaviors, end the conversation.
- High-Pressure Sales: Legitimate companies give you time to think. If a technician says, “This price is only good for right now,” or tries to scare you into an immediate decision, show them the door.
- The Bait-and-Switch: This is the most common scam. You see an ad for a “$29 Tune-Up.” The tech arrives, glances at the door, and claims you need $800 in “emergency repairs” before he can leave.
- Carlos’s Advice: If the final price is wildly different from the phone estimate without a solid explanation (like hidden structural damage), get a second opinion.
- Unmarked Vehicles: A professional company invests in branded trucks and uniforms. If a guy rolls up in a rusted sedan with a magnetic decal on the side, you are likely dealing with an unlicensed subcontractor.
- Poor Communication: If they don’t return calls or miss the estimate appointment without notice, do not hire them. If they are disorganized before they have your money, it won’t get better after they have it.
8 Questions to Ask Before You Hire
The right questions separate qualified professionals from “fly-by-night” operators. Don’t be shy about interviewing them. In my experience, legitimate companies welcome these questions because they show you value quality, and we know we will pass the test.
Use this checklist when you have them on the phone:
1. How long has your company been in business?
New companies aren’t automatically bad, but an established company (5+ years) has weathered economic downturns and proven they treat customers right.
- Follow-up: “How much experience does the specific technician you are sending have?” (You want a seasoned pro, not a trainee).
2. Are your technicians IDA Certified?
The International Door Association (IDA) is the gold standard for our trade. Certification means the technician has passed exams on safety, installation codes, and troubleshooting. It demonstrates a commitment to the craft beyond just “fixing stuff.”
3. Can you email me a copy of your insurance certificate?
Do not accept a verbal “Yeah, we’re insured.” Ask to see the paper. You need to verify two things:
- General Liability: Covers damage to your home (e.g., they drop a tool on your car).
- Workers’ Compensation: Covers the technician if they get hurt. Without this, you could be sued for their medical bills.
4. What is your warranty on Labor vs. Parts?
Distinguish between the two.
- Parts Warranty: Comes from the manufacturer (usually 1–5 years).
- Labor Warranty: Comes from the local company. A reputable shop should guarantee their workmanship for at least 1 year. If they only offer 30 days, they aren’t confident in their fix.
5. Can you provide references from the last 3 months?
References from five years ago don’t tell you how the company is performing now. Ask for recent examples of projects similar to yours.
- What to ask the reference: “Did they show up on time? Did they clean up the grease/debris? Did the final price match the quote?”
6. What is the timeline for this job?
An experienced contractor knows exactly how long a spring swap or opener install takes (usually 1–3 hours). If they are vague or say “it depends” without explaining why, they might be inexperienced.
7. How do you handle unexpected findings?
Sometimes we open a wall and find rot, or take down a spring and find a cracked bearing plate. Ask them: “If you find more damage, do you stop and get my approval for the new price, or do you just fix it and bill me?” (The answer should always be: Get approval first).
8. What payment methods do you accept?
This is a quick “legitimacy test.”
- Green Flag: They accept credit cards, checks, and financing.
- Red Flag: They demand cash only or a large deposit via Venmo/Zelle before showing up. This usually signals they are avoiding taxes or planning to disappear.
Repair vs. Replace: Making the Right Financial Call
This is the most common question I get: “Carlos, is this thing worth saving?”
The answer depends on more than just the immediate problem. It’s a balance of safety, budget, and long-term value. Here is the framework I use to help clients decide whether to patch it up or rip it out.
When Replacement Makes Financial Sense
If your system hits any of these benchmarks, it is usually smarter to replace it.
- The “50% Rule”: If the cost of the current repair is 50% or more of the cost of a brand-new door, replace it. You get a new warranty, better insulation, and modern safety features for a comparable investment.
- Age (The 20-Year Mark): Most wood and steel doors have a functional lifespan of 15–30 years. If your door is older than 20 years and needs a major repair (like new springs and cables), you are likely just buying time before the next component fails.
- Safety & Tech Deficiencies: If your opener was manufactured before 1993, it likely lacks federal safety sensors (the “eyes” at the bottom). For the safety of your family and pets, replace these units immediately. Modern openers also offer Rolling Code technology (anti-hacking) and Battery Backups for power outages.
- Severe Structural Damage: If a car backed into the door and bent two or more sections, replacement is often cheaper than repair. Buying individual panels is expensive, and new panels will be bright white while your old ones are faded yellow, creating a “patchwork” look.
- Obsolete Parts: If we have to scour eBay or salvage yards to find a hinge for your door because the manufacturer went out of business in 2005, it’s time to upgrade. “Frankenstein” doors rarely run smoothly.
When to Repair (Save Your Money)
Don’t let a salesman talk you into a new door if you just need a tune-up. Repair is the logical choice if:
- The Issue is isolated: Broken springs, worn rollers, or a stripped gear in the opener are standard maintenance items. If the door panels themselves are straight and rust-free, a $200–$300 repair can buy you another 5–10 years of service.
- Recent Installation: If your door is only 5–10 years old, it has plenty of life left. Even a major failure (like a snapped cable) is worth fixing because the rest of the system is still sound.
- Specific Aesthetics: If you have a custom cedar carriage house door that matches your home’s trim perfectly, replacing it might cost thousands. In this case, spending more on repairs to preserve the curb appeal makes sense.
- Budget Constraints: Sometimes, a new door isn’t in the budget. A “Band-Aid” repair (fixing just what is broken to make it safe) is perfectly acceptable as a stopgap measure, provided you understand it’s a temporary solution.
Conclusion: Getting Professional Help Near You
Your garage door is the largest moving object in your home. It deserves more than a quick glance.
When you are ready to call a professional, look for a company that offers a comprehensive system evaluation. A real technician won’t just look at the broken spring; they will inspect the entire ecosystem, cables, drums, rollers, hinges, and the opener’s logic board to give you a complete picture of your system’s health.
Ready to get your door back on track? Don’t wait for a small squeak to turn into a midnight emergency. Schedule a consultation with a licensed, insured expert today to ensure your home remains secure and your routine stays uninterrupted.
Ask the Expert: Q&A with Carlos
Q: How do I find reliable garage door repair near me ?
Don’t just pick the first result on Google. Look for a local company with a physical address in your area, not a generic 1-800 number. Check reviews across multiple platforms (Google, Yelp, Nextdoor) and specifically look for mentions of “showing up on time” and “honoring the quote.”
- My Tip: Verify they are licensed and insured. A reputable provider will happily email you their proof of insurance and offer a free estimate without using high-pressure sales tactics.
Q: Can I fix the door myself, or do I need a pro ?
It depends on the part. Safe DIY tasks include lubricating rollers, tightening loose nuts, and cleaning safety sensors.
- The Hard Rule: Call a professional for broken springs, snapped cables, or off-track doors. These components are under extreme tension. I have seen too many injuries from homeowners trying to DIY a torsion spring without the proper winding bars. If you are unsure, paying for a diagnostic visit is cheaper than an emergency room bill.
Q: How often should I perform maintenance ?
I recommend a “6-month / 1-year” schedule.
- Every 6 Months (DIY): Lubricate all moving parts (hinges, rollers, springs) with silicone spray and test the safety reversal system with a 2×4 block.
- Every Year (Professional): Schedule a professional tune-up. We check the internal opener gears, balance the spring tension, and inspect cables for hidden fraying that you might miss. Consistent maintenance is the best way to extend your system’s lifespan and avoid midnight failures.
Q: Why is my door making a loud grinding noise ?
Grinding usually means metal-on-metal friction. It’s often caused by worn-out rollers (where the wheel has stopped spinning and is just dragging) or a lack of lubrication on the spring coils. If the noise is more of a “rattle,” you likely have loose track hardware that needs tightening.
Q: My remote works, but the wall button doesn't. What's wrong ?
This is almost always a wiring issue. If the LED light on your wall button is dead or flickering, the low-voltage wire connecting it to the motor might have a short or a break. If the button works but you have to hold it down to close the door, that is actually a safety sensor error, not a button problem.